How to Make a Dog Collar On Your Own
January 5, 2012 - By Troy Corbin
There's no feeling in the world like making an article of clothing for a family member. As a beloved part of your family, making your dog a collar can also provide a great feeling. Read on for some easy to follow steps that will have your dog sporting a beautiful new collar in no time!
Please Note: This How To Make A Dog Collar guide assumes you are already familiar with the use of your sewing machine. If you are not, please familiarize yourself with it's basic operation before continuing with this how to.
Alternative Webbing Only Collar: This How-To shows you how to make a dog collar wrapped in a designer pattern of your choice. However, if you want to make a simpler nylon webbing collar without the fabric, we can still help. Simply skip Step One, perform Step Two, then skip all the way to Step Nine.
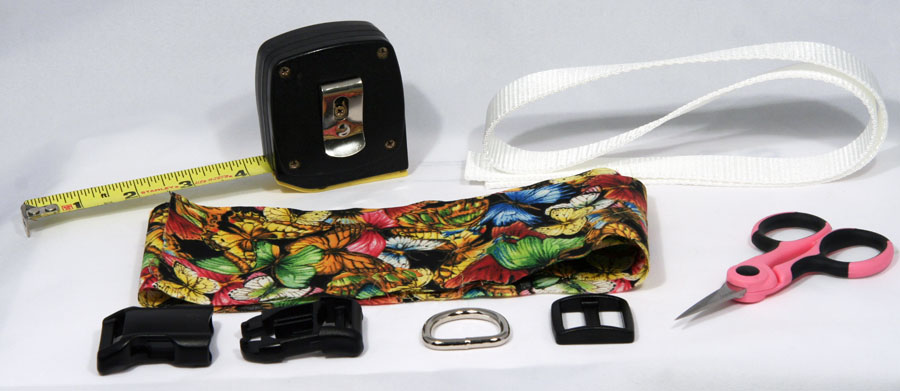
Supplies Needed To Make A Dog Collar:
- Your choice of Fabric
- Nylon Webbing *
- Contoured Side Release Buckle *
- Triglide Slide *
- D-Ring *
- Sewing Machine
- Iron
- Scissors
- Measuring Tape
- Spray Starch
* You can shop for these items individually or just pick up our easy Do it Yourself Dog Collar Kits that includes a printed copy of these instructions.
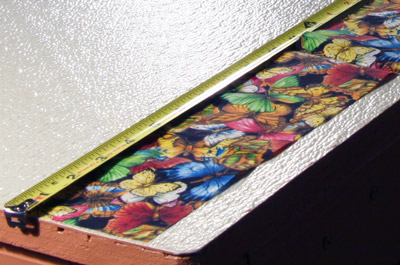
You will need to determine what your dog's collar size is so that you can cut your webbing and fabric to the correct lengths.
Refer to this chart to determine the correct lengths for your fabric and webbing:
| Collar Size | Finished Length | Fabric Size | Webbing Type | Webbing Length | Neck Size |
| Extra Large | 28" | 3" x 38" | 1" Heavy Nylon | 35" | 18" - 26" |
| Large | 24" | 3" x 33.5" | 1" Heavy Nylon | 31" | 16" - 22" |
| Medium | 18" | 3" x 27.5" | 3/4" Heavy Nylon | 25" | 13" - 16" |
| Small | 15" | 3" x 24.5" | 3/4" Light Nylon | 22" | 11" - 13" |
| Extra Small | 12" | 3" x 19" | 5/8" Light Nylon | 17" | 9" - 11" |
| Mini | 10" | 3" x 16.5" | 1/2" Polypropylene | 15" | 7" - 9" |
Your hardware needs to match the webbing type for your particular collar. For example, if you are building a Medium collar, you should have a 3/4" buckle, triglide, and D-ring.
1. Cut Your Fabric
Use the measurements in the table above as a guide. The 3" width isn't set in stone: You need enough width to cover both sides of the webbing as well as its depth. So as you go down to smaller collars, you could reduce the width of the fabric to match. However, we recommend you start with 3" and adjust as you get more practice.

2. Cut Your Webbing
Remember to measure twice and cut once! Also, you may want to heat the ends to melt the individual fibers together. Doing this will ensure that the individual fibers in the webbing do not start unraveling on you. If you're not quite sure how to do all that, don't worry! We have a handy guide here to help you cut your webbing properly.
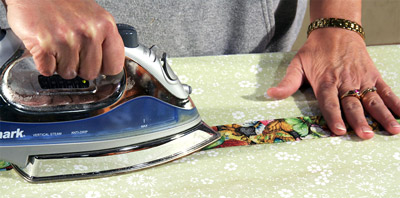
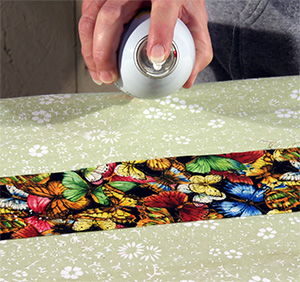
3. Prep The Fabric
Before you sew your first stitch, spray it quickly with a burst of starch. Afterward, take a hot iron and smooth out your fabric as much as possible. This step helps to remove wrinkles and will give you a more accurate stitch when you get ready to sew.
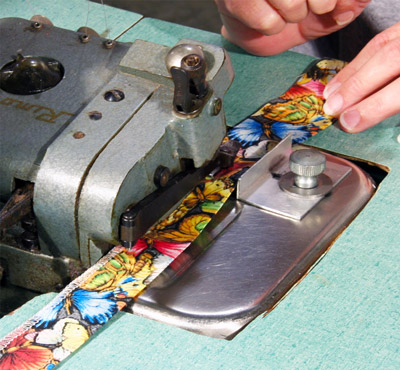
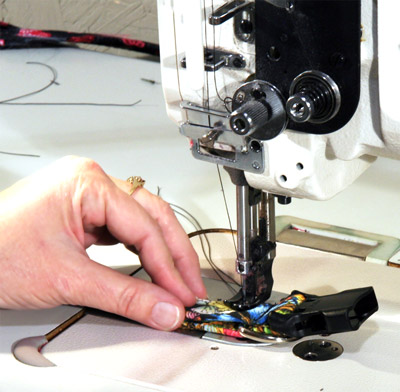
4. Sew Your Fabric Tube
Now that your fabric is ready, we're going to sew it into the shape of a long tube. This tube will eventually slip over the webbing core of your dog collar. We use a professional surge machine for this step, though you can either use a home surge machine or a regular sewing machine. Be sure to sew your fabric inside out to hide the stitching. You want to make your loop large enough that you can slide your webbing through without much trouble. Once your fabric is in a loop, cut off the excess fabric so that we can slip it over the webbing more easily.
5. Turn The Fabric
Since we sewed your fabric inside out, we'll need to turn it inside-right again before we continue! There are a number of ways to accomplish this step. Here is a popular technique, The Chopstick Method.
6. Insert Your Webbing
Slide the webbing through the looped fabric. Once it is in, you'll want to adjust the fabric so that the seam is aligned straight against the edge of the webbing. Doing this ensures that your finished collar looks its best.
7. Prep The Dog Collar
It's starting to come together! Once again, spray your collar with a quick burst of starch. Then take a hot iron to it. This helps remove wrinkles and sets the seam which will make your next step ( sewing the fabric and webbing together ) much easier.
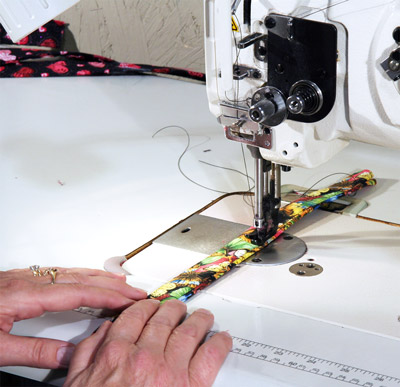
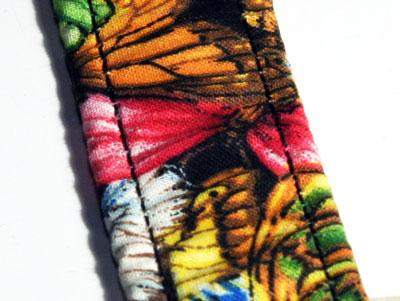
8. Sew Them Together
Sew the webbing and fabric together using a seam down each side of the collar. It is very important to make sure the thread goes through both the webbing and the fabric. On larger collars, this stitch is made about 1/4" from the edge. For smaller collars you'll want it closer to the edge, but not so close that you miss the webbing!
9. Add Your Triglide
Slide our triglide on, weaving it through the dog collar. This is done by slipping the webbing up through one side of the triglide, over the center bar, and back down through the other slot. Leave about an inch on one side to loop back under the triglide.
10. Necessary Stitches
Time to review your stitching. These stitches will be used in a minute to create a secure and sturdy dog collar. If you are a new sewer, you may want to practice these stitches on some scrap fabric before trying it on your new dog collar. First up is the Triple Stitch:
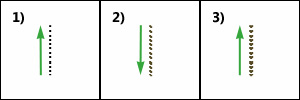
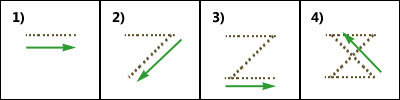
Triple Stitch
- Stitch forward.
- Then backstitch.
- Then, stitch forward again.
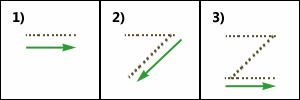
Z Stitch
- Perform a triple stitch.
- Turn it at a ~45°, then backstitch.
- Then, perform another triple stitch.
Box Stitch
- Perform a triple stitch
- Turn it at a ~45°, then backstitch.
- Then another triple stitch.
- Another 45° angle, then back to where you started.
11. Sew On The Triglide
Sew the triglide in with a Box Stitch ( As seen in Step Ten ) It should now be at the very end of your dog collar.
12. Add Your Buckle
Slide the male end of the side release buckle onto the dog collar. First insert the webbing from the bottom of the buckle through the inner slot, over the crossbar then down through the outer slot. Pull it all the way up to the triglide. The male prongs should face the triglide.
13. Back Through The Triglide
Now weave the webbing back through the triglide. This should lock the male end of the buckle in a loop made by the collar and triglide.
14. Add Your D-Ring
Slide the D-Ring onto the dog collar. It doesn't matter where it ends up at this point.
15. The Other Half Of The Buckle
Take the female end of the buckle and slide it up to your desired collar length. ( See the chart at the beginning of this How To for the finished length ) For all collar sizes except Mini, go ahead and Triple Stitch the female buckle end in place.
16. Box Stitch
Slide the D-ring up to the Triple Stitch you just made ( or on a Mini, up to the female side of the buckle ) and them sew a Box Stitch. You should aim at making the box ~1”, cutting the excess fabric off.
17. You're All Finished Making Your Own Dog Collar
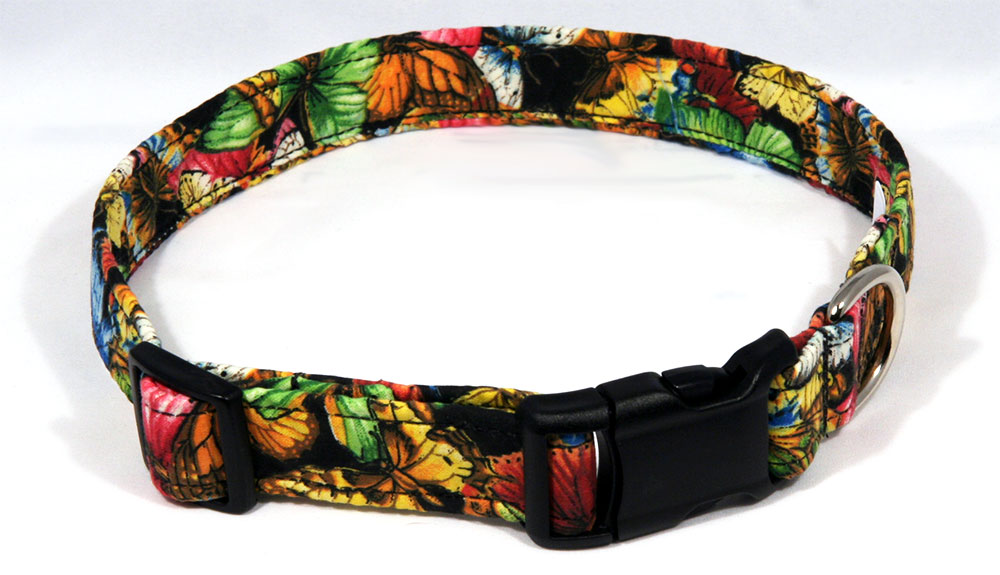
Congratulations! You now know how to make a dog collar for your beloved pet. Making dog collars for your family pets is a rewarding experience that only gets better with time, so be sure to experiment with different fabrics.